
CostBeacon का उपयोग कैसे करें
ऐप के बारे में विषयों को खोजें। उत्पाद संबंधी प्रश्नों के लिए, FAQ देखें। अक्सर पूछे जाने वाले प्रश्न
First invoice
Start here
- 1
Upload an invoice
Add a supplier PDF or image to start building your line-item history.
- 2
We read the data
CostBeacon extracts invoice lines, units, and supplier details.
- 3
Check for changes
Review new costs against the history already in your workspace.
- 4
Take action
Open the source invoice, review the evidence, and decide what to do next.
Help library
Popular answers
Alerts & riskPrice alerts
Get notified when unit costs move — configure workspace policy and per-product rules.
Alerts turn price changes into actionable pings — not spreadsheet hunting.
When to use this
- You want email or in-app notice when key products rise.
- A supplier sent a new invoice and you need to react quickly.
Step-by-step
- Set workspace policy under Settings → Pricing rules (plan permitting).
- Fine-tune from Results or Products alert dialogs.
- Review fired alerts in Notifications.
Upload & reviewUpload invoices
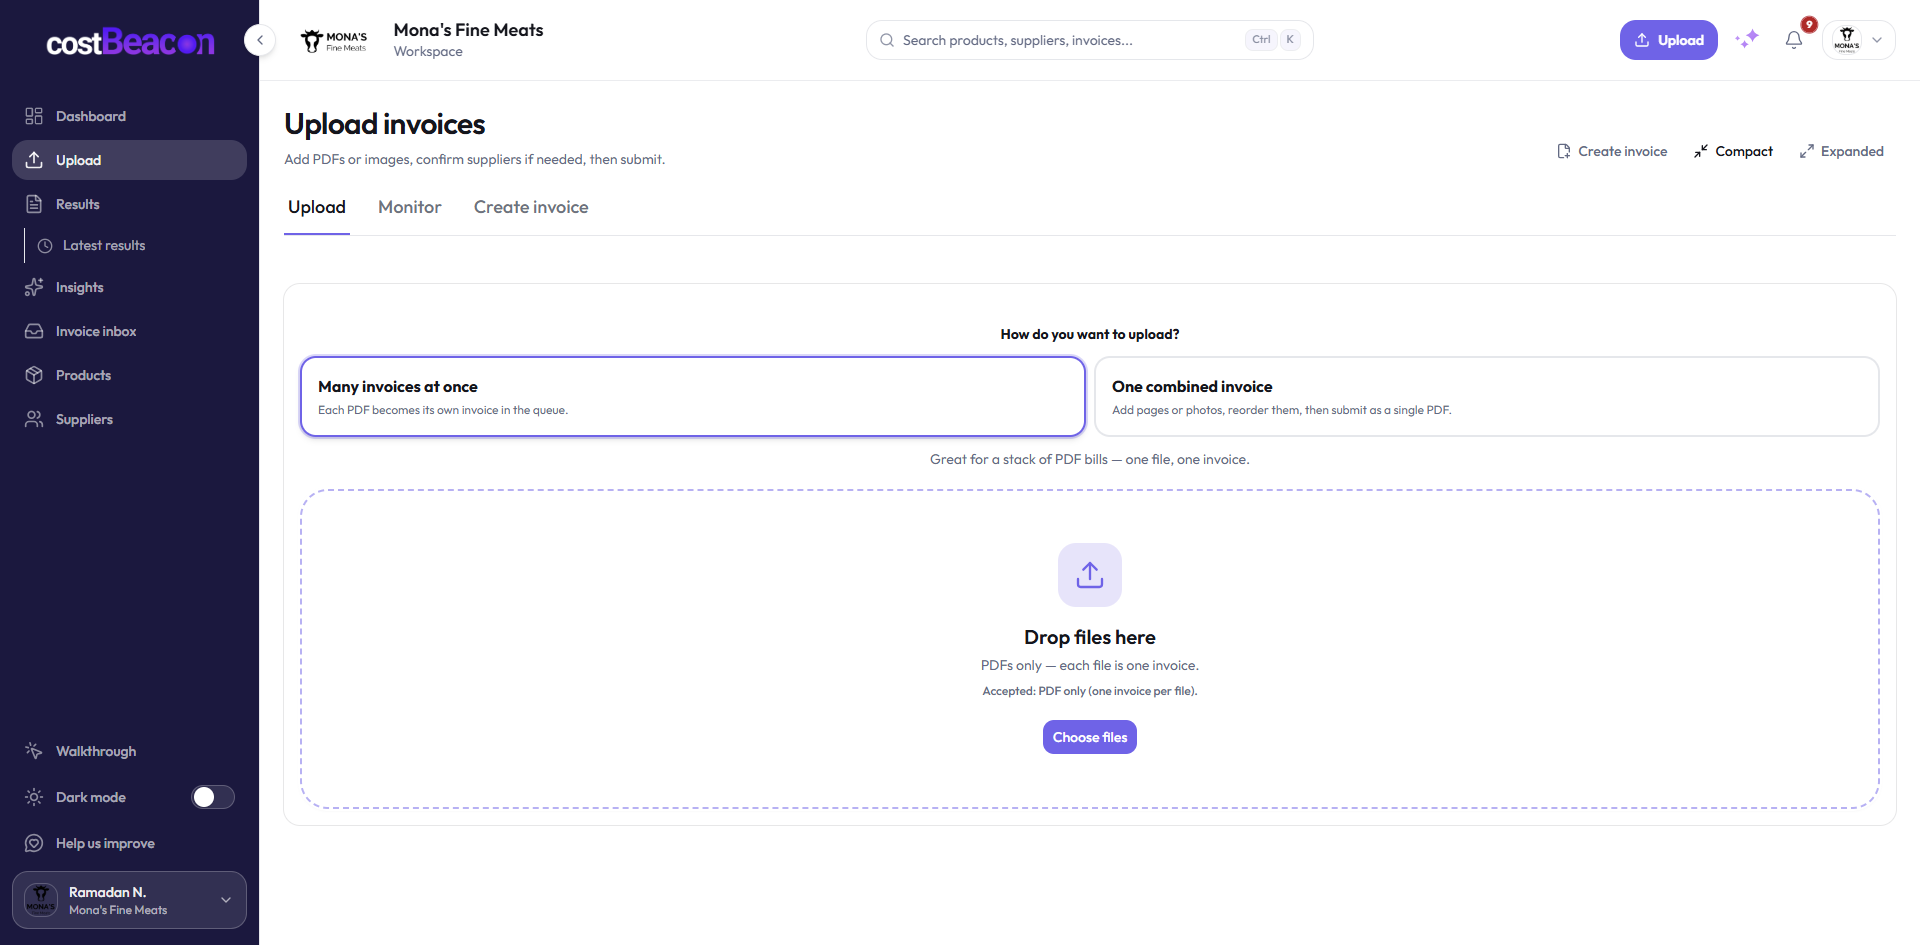
Add PDFs or images in bulk or one at a time. Every file needs a supplier before it enters AI extraction.
Upload is the main ingestion path for supplier bills.
When to use this
- Bulk — a folder of separate PDF invoices.
- Single — one invoice photographed or scanned across pages.
- Email inbox — for forwarded PDFs (see Invoice inbox article).
Step-by-step
- Pick Bulk or Single at the top.
- Add files via drag-and-drop or file browse.
- For each row, select or create a supplier.
- Use compact view for long queues; expanded for detail.
- Submit all ready rows — parallel processing starts immediately.
Troubleshooting
- Supplier missing? Create one from the row dropdown before submit.
- Stuck processing? See Notifications → failed; retry when offered.
Upload & reviewSuppliers directory
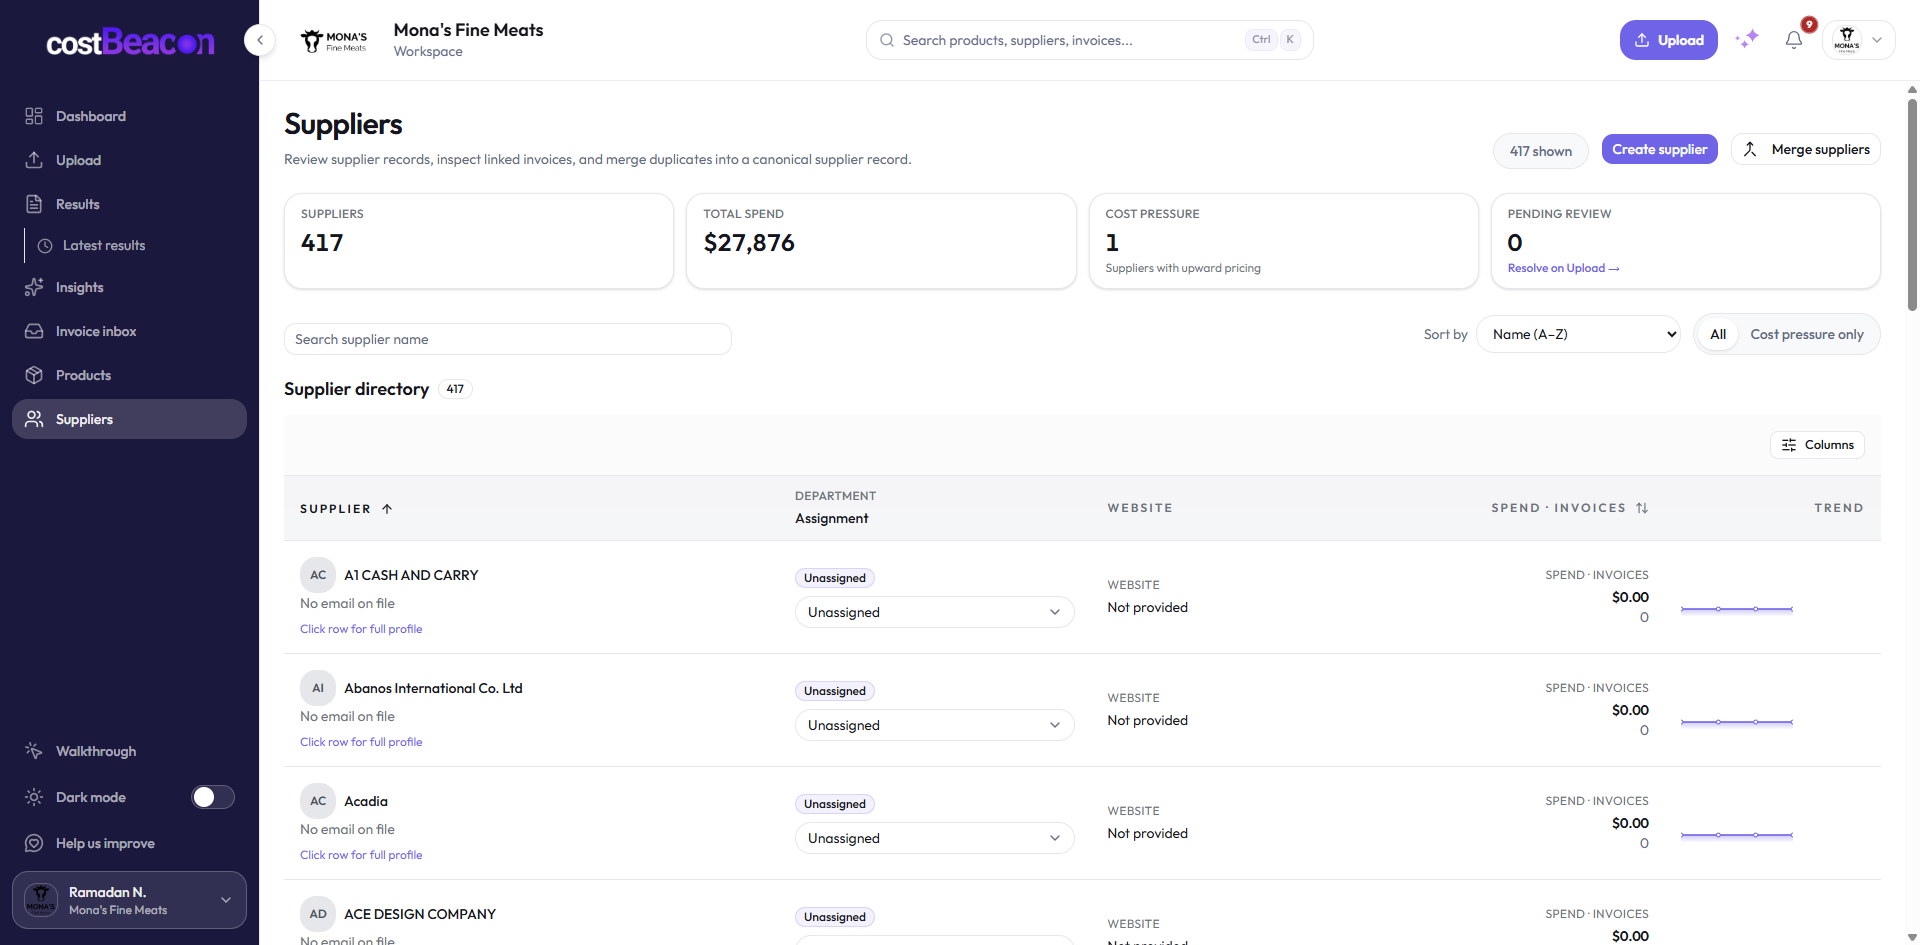
Create vendors, merge duplicates, assign departments, and jump into Results for one supplier.
Clean supplier data keeps spend and price history accurate.
Step-by-step
- Scan the KPI strip for workspace-wide supplier pressure.
- Search, sort, or filter high-risk vendors.
- Create a supplier before upload if they are not on the PDF.
- Merge duplicates to combine history.
- Open a row for contacts, margin override, and department assignment.
Troubleshooting
- Duplicate suppliers? Merge from the directory actions — do not re-upload under two names.
Settings & workspaceIntegrations (QuickBooks)
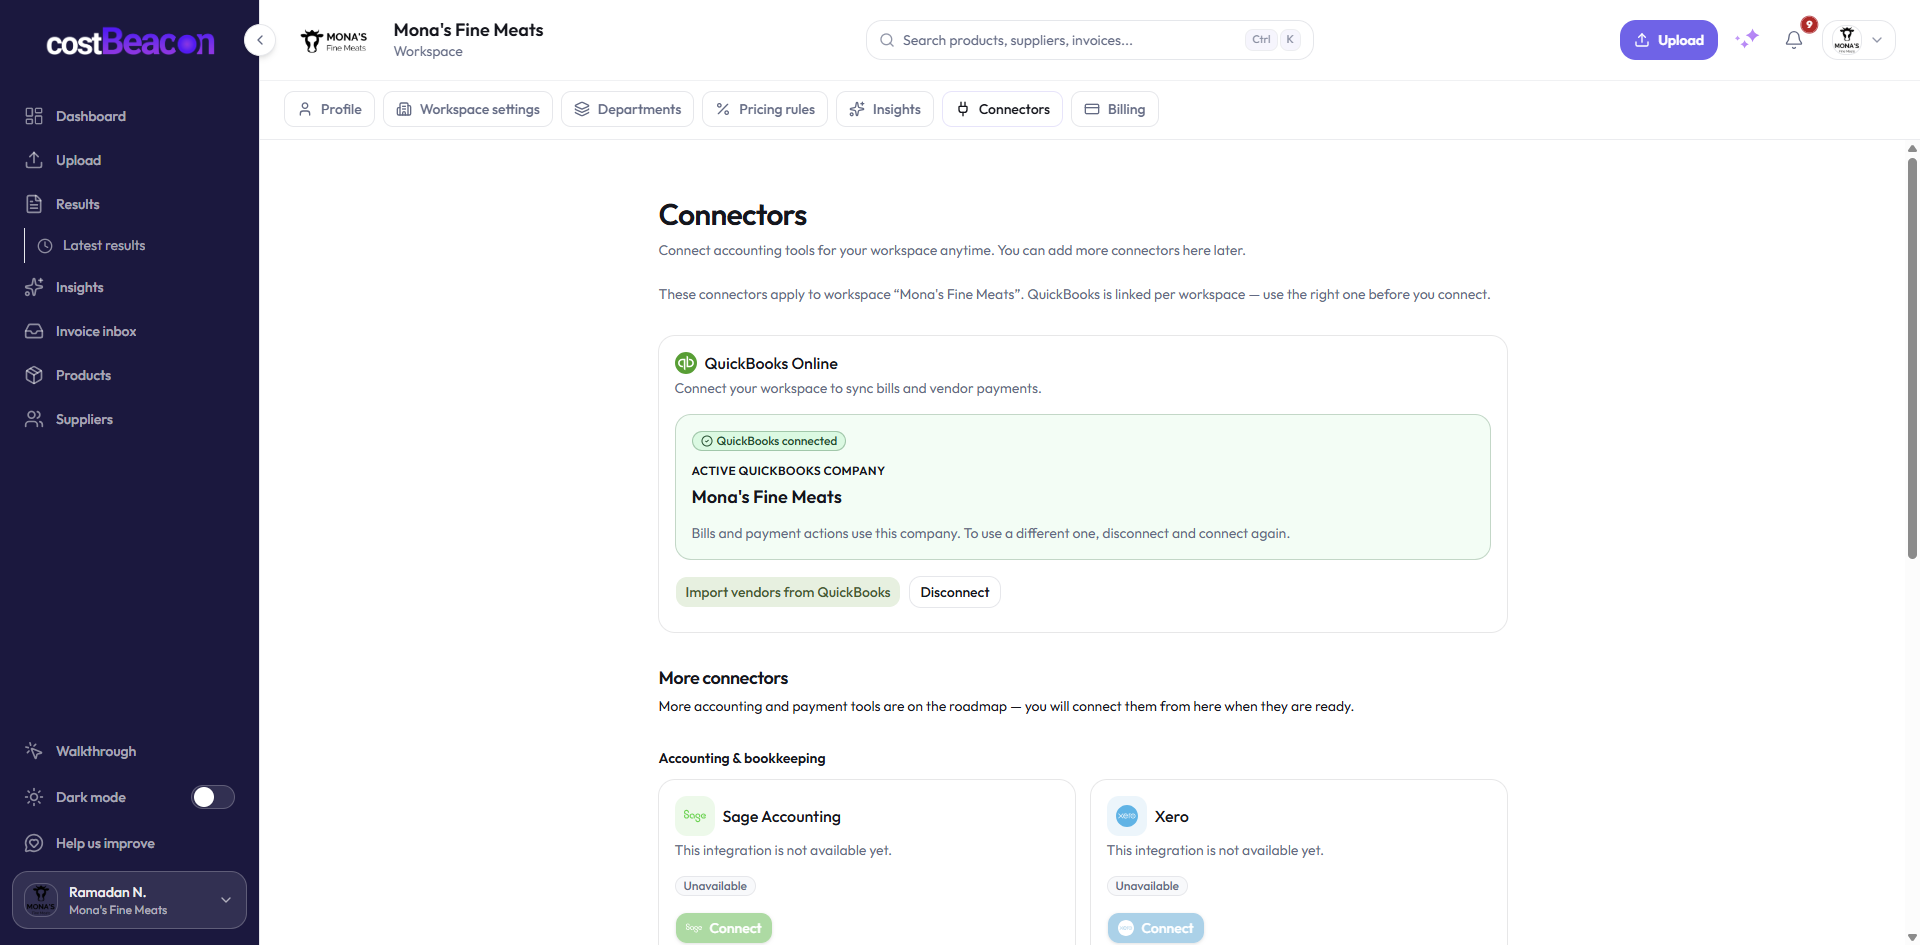
Connect QuickBooks Online, then create bills or payments from Results.
Sync accounting context without re-keying invoice totals.
Step-by-step
- Open Settings → Integrations.
- Click Connect on QuickBooks Online.
- Sign in with Intuit and approve access.
- Confirm status shows connected after redirect.
Alerts & riskRisk tiers, impact, and margin terms
Plain-language definitions for impact, CBSRP, thin margin, and risk tiers — how CostBeacon prioritizes changes.
CostBeacon ranks changes so you fix what hurts margin first.
Impact
A priority score from price increase, quantity, and a time horizon — not a dollar P&L line. Higher impact appears first on lists.
Risk tiers
Critical / High / Moderate / Minor buckets based on dollar cutoffs you set under Settings → Insights.
Unit cost
product.price is what you paid the supplier, not your shelf price.
CBSRP
CostBeacon sticker price — suggested sell from margin rules (previous cost × (1 + margin%)). Used in thin-margin and out-of-margin signals.
Thin margin vs out of margin
- Thin margin — cost is consuming most of your target margin.
- Out of margin — latest cost exceeds the sticker implied from the prior price point.
Upload & reviewDashboard overview
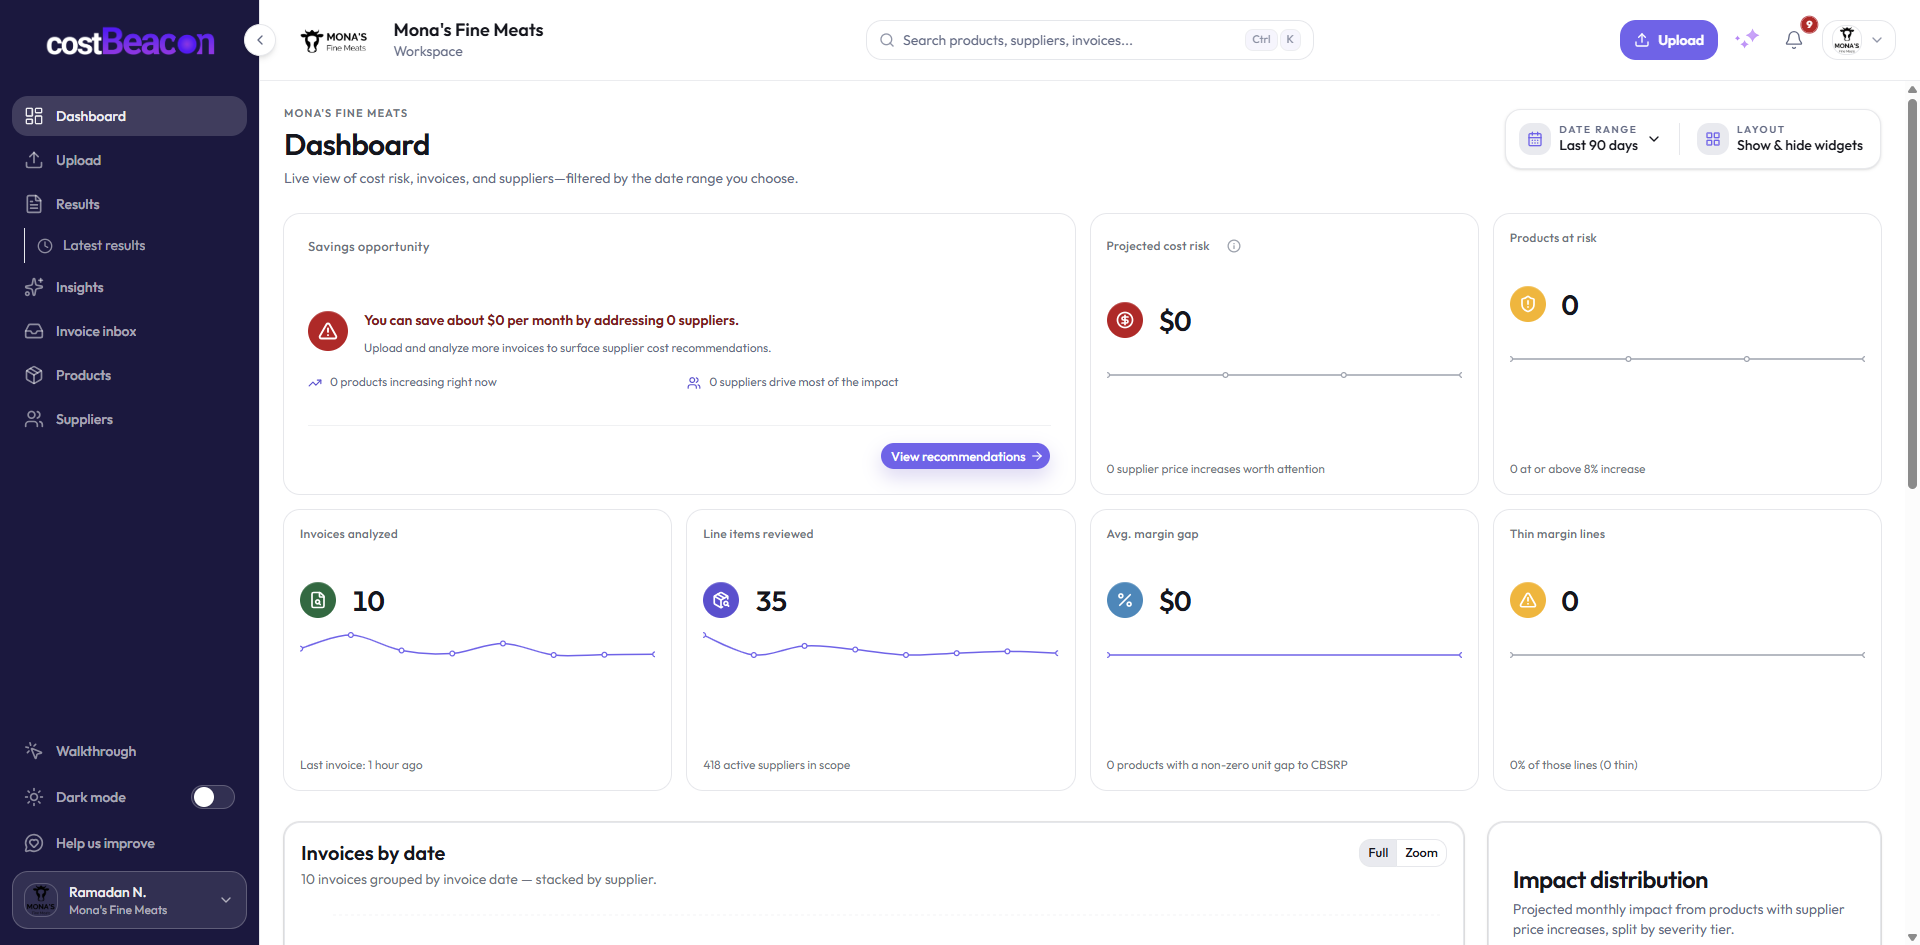
Your daily cost snapshot: pick a reporting window, scan KPI tiles, then drill into spend drivers, top risks, and margin watchlists.
The Dashboard answers: What changed in this period, and where should I look first?
When to use this
- Morning check-in on price pressure and spend.
- After a batch upload to see if anything spiked.
- Before a supplier call — export mental notes from top risks.
Step-by-step
- Set the reporting window at the top (preset or custom range).
- Scan snapshot KPIs — impact, volume, and margin signals.
- Review volume & mix and spend drivers charts.
- Open top risks and margin watchlists for follow-up.
- Use Customize to show only widgets you use daily.
Troubleshooting
- Empty dashboard? Upload invoices or widen the date range.
- Widgets missing? Open Customize and re-enable tiles.
Getting startedCreate an account and sign in
Register with your work email at app.costbeacon.com, confirm if needed, then sign in to reach your workspace or onboarding.
CostBeacon runs at app.costbeacon.com. Your account is personal; workspaces (businesses) are created or joined after you sign in.
When to use this
- You are setting up CostBeacon for the first time.
- You received a team invite — use the same email the invite was sent to.
- You need to sign in on a new device.
Step-by-step
- Open Sign up and enter your work email and a password (minimum six characters).
- Complete email verification if prompted.
- Go to Log in, enter your credentials, and choose Remember me on trusted devices.
- You will land on onboarding (new workspace) or the workspace picker (existing access).
Troubleshooting
- Invite not showing? Confirm the invite email matches your login email exactly.
- Password reset? Use Forgot password on the login page.
Getting startedSet up your workspace
The onboarding wizard creates your business workspace: name, address, locale, and optional logo before your first upload.
A workspace is the container for invoices, suppliers, products, and settings. Most owners complete onboarding once, then invite teammates.
When to use this
- First sign-in after creating your own account.
- Creating an additional business under the same login (see workspace picker).
Step-by-step
- Enter your business display name — this appears in the sidebar and reports.
- Add address and locale so dates and currency format correctly.
- Upload an optional logo for the team directory.
- Finish the wizard — you are prompted to upload an invoice or connect QuickBooks.
Troubleshooting
- Stuck on onboarding? Complete required fields; refresh only if the page froze mid-step.
Getting startedSwitch between workspaces
One login can access multiple workspaces. Switching changes every screen to that business's data right away.
Run more than one business? Each workspace keeps invoices, suppliers, and settings fully separate.
When to use this
- You operate multiple stores or entities under one email.
- You were added to someone else's workspace as a teammate.
Step-by-step
- Open your profile menu at the bottom of the sidebar.
- Choose Switch workspace or See all workspaces.
- Pick the workspace card — dashboard, upload queue, and suppliers update immediately.
- To add another business, use Create workspace on the picker.
Getting startedYour first invoice upload
Upload a supplier PDF, assign the vendor, submit, and review line items in under a minute — then check Latest results for price changes.
CostBeacon turns supplier PDFs into structured line items and compares prices to prior invoices automatically.
Step-by-step
- Open Upload from the sidebar or the header button.
- Choose Bulk (one PDF = one invoice) or Single (multi-page or photos).
- Drop files in the dropzone and assign a supplier to each invoice.
- Submit — processing usually finishes in under a minute per file.
- Open Latest results or Notifications when processing completes.
Troubleshooting
- Processing failed? Check Notifications for details; try a clearer PDF scan.
- No price change yet? You need at least two invoices with the same product line for a comparison.
Upload & reviewResults — full history
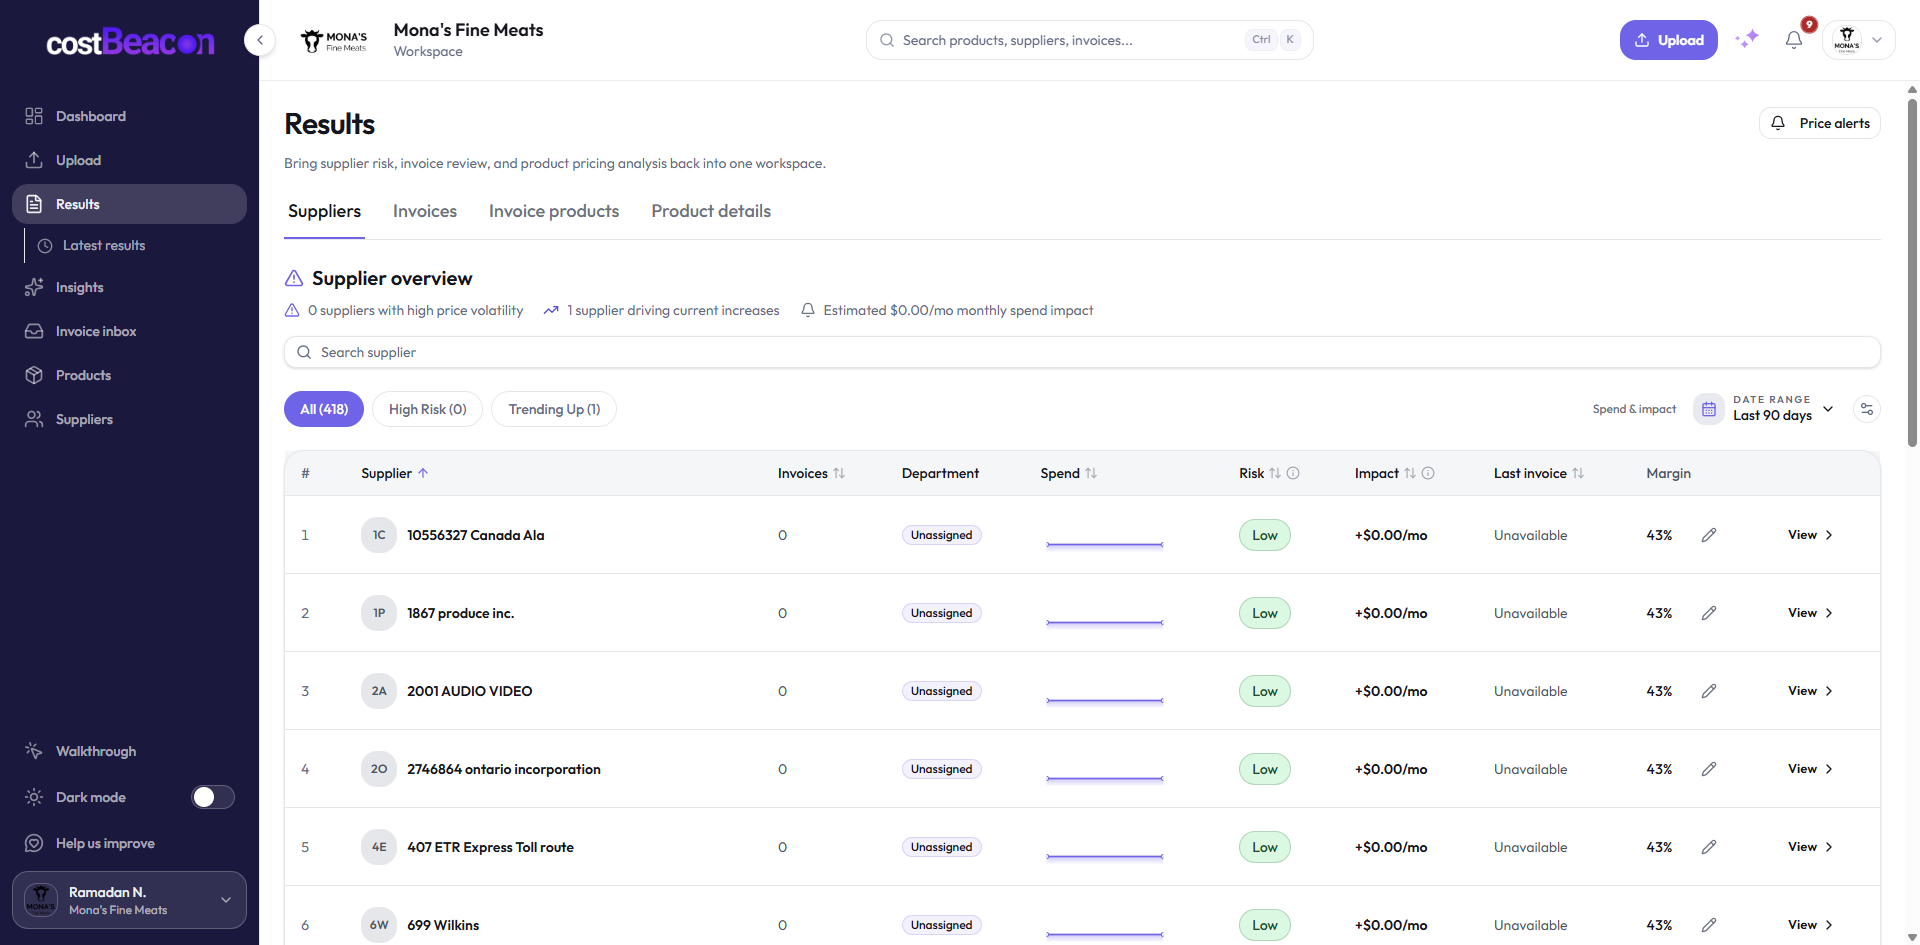
Drill from suppliers to invoices, line items, and product price history — the full timeline behind every change.
Results is your investigative workspace across all processed data.
When to use this
- Tracing a price increase to a specific invoice line.
- Reviewing spend concentration by supplier.
- Creating QuickBooks bills from processed invoices.
Four tabs
- Suppliers — spend and price pressure by vendor
- Invoices — headers, totals, processing status
- Invoice products — lines on a selected invoice
- Product details — full price history for one catalog item
Troubleshooting
- Product not merged? Names may differ across invoices — check spelling in Products.
Upload & reviewLatest results
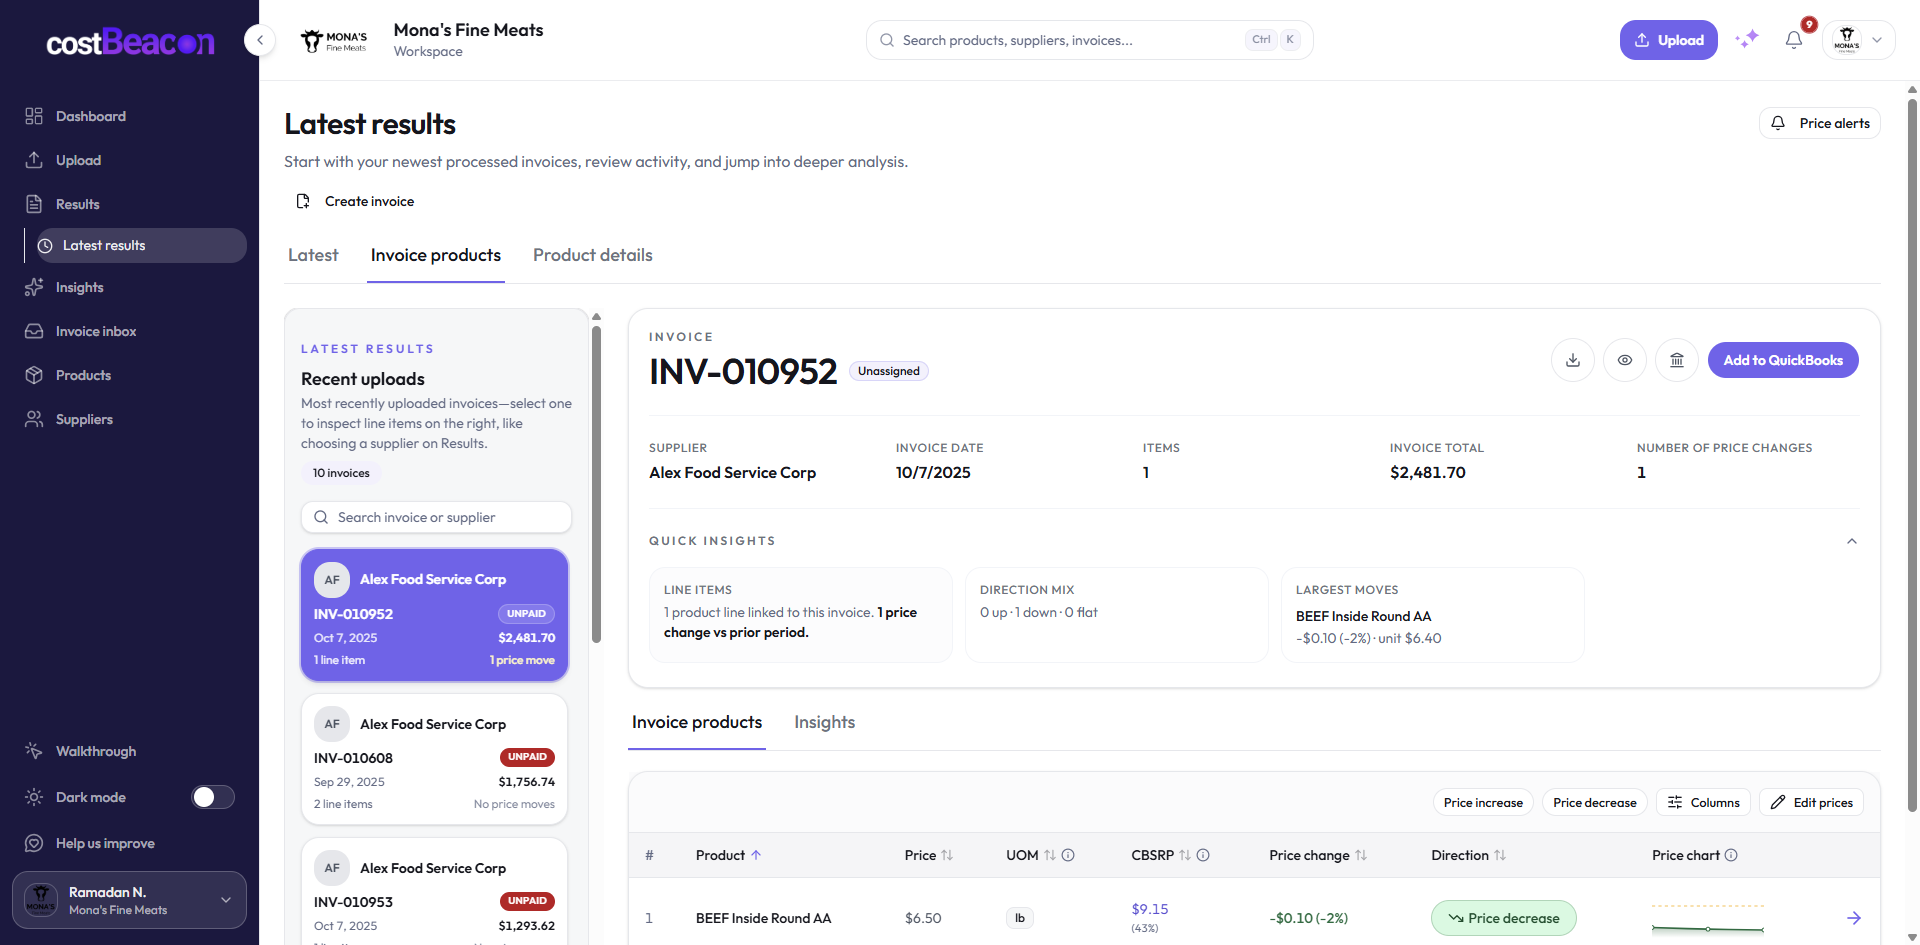
A fast pass on what just landed — newest invoices and movers without scrolling full history.
Open Latest results right after uploading — it highlights what changed recently.
When to use this
- After an upload batch.
- Weekly scan for repeat offenders.
- Quick price-alert follow-up.
Step-by-step
- Review the Latest overview for movers and repeats.
- Switch to Invoice products for line-level detail.
- Open Product details when chasing one SKU.
- Use header shortcuts for manual invoice entry or alert settings.
Upload & reviewInsights
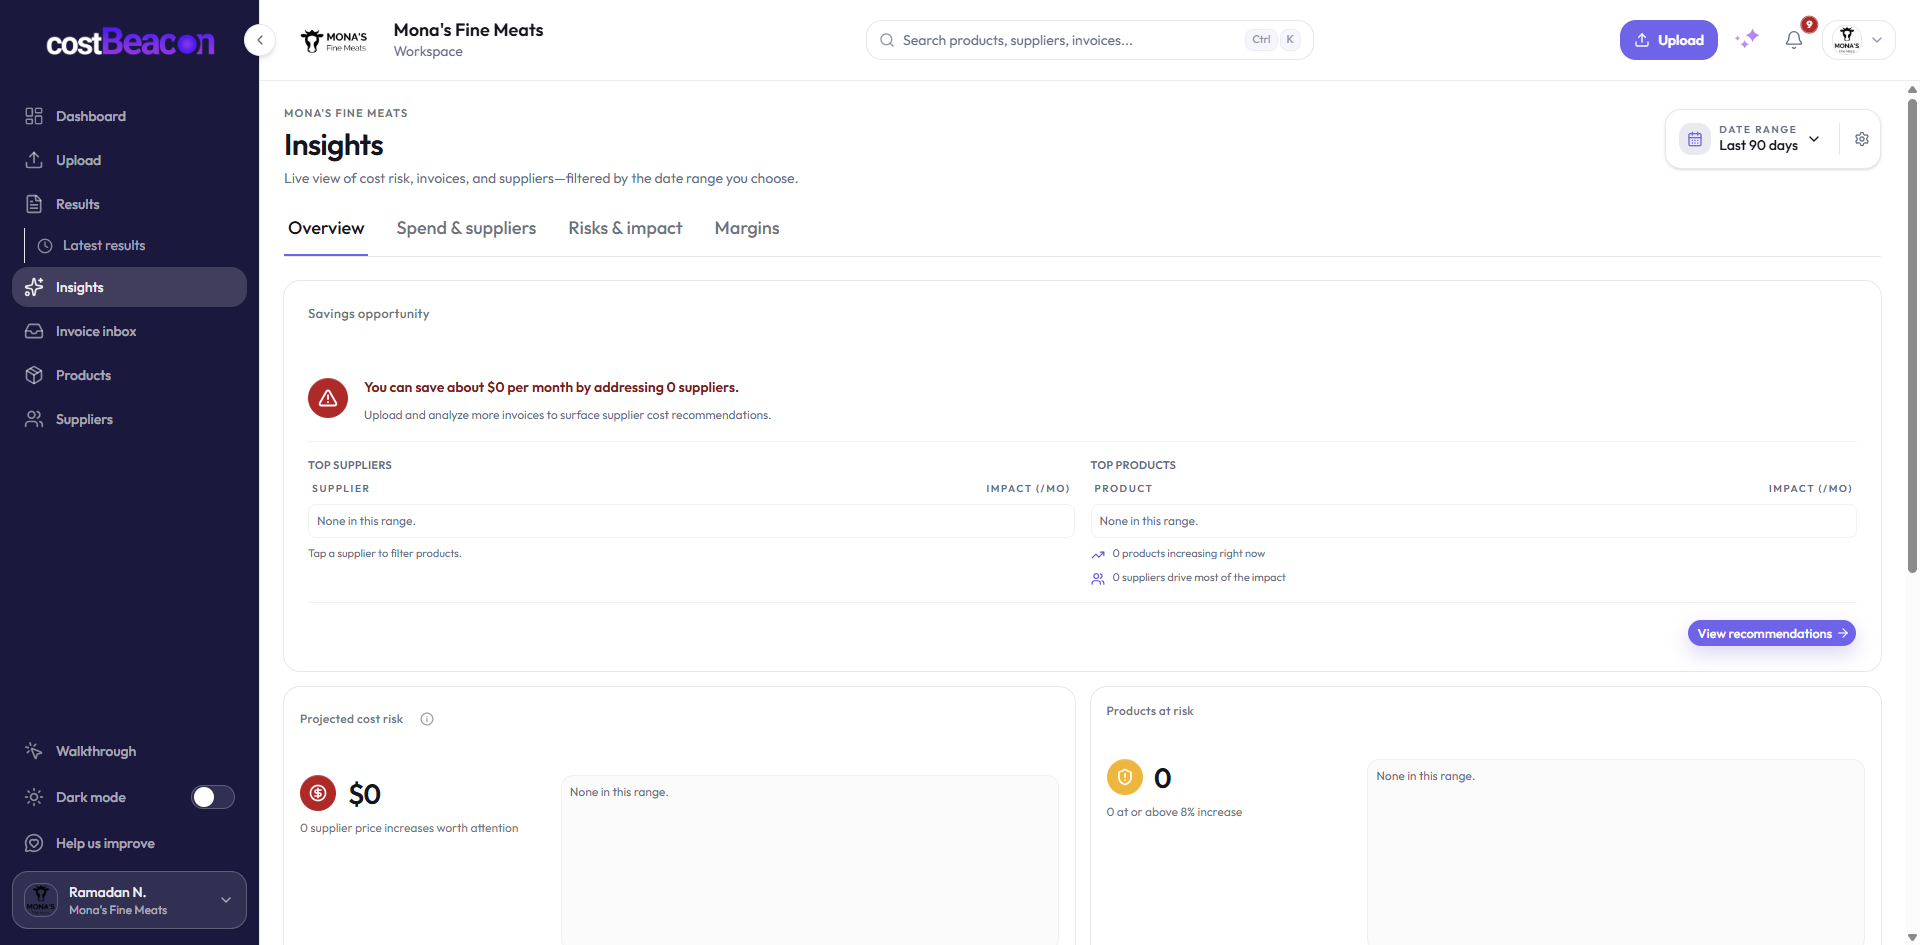
Chapter-by-chapter analytics: overview, spend, risks, and margins for the same reporting window as your dashboard.
Insights explains why numbers moved — not just that they moved.
Step-by-step
- Set the date range to match the period you are analyzing.
- Start on Overview for headline trends and department spend.
- Use Spend for supplier and category drivers.
- Use Risks for spikes and concentration.
- Use Margins for thin-margin and out-of-margin lists.
- Click the gear icon to tune thresholds in Settings → Insights.
Upload & reviewInvoice inbox (email)
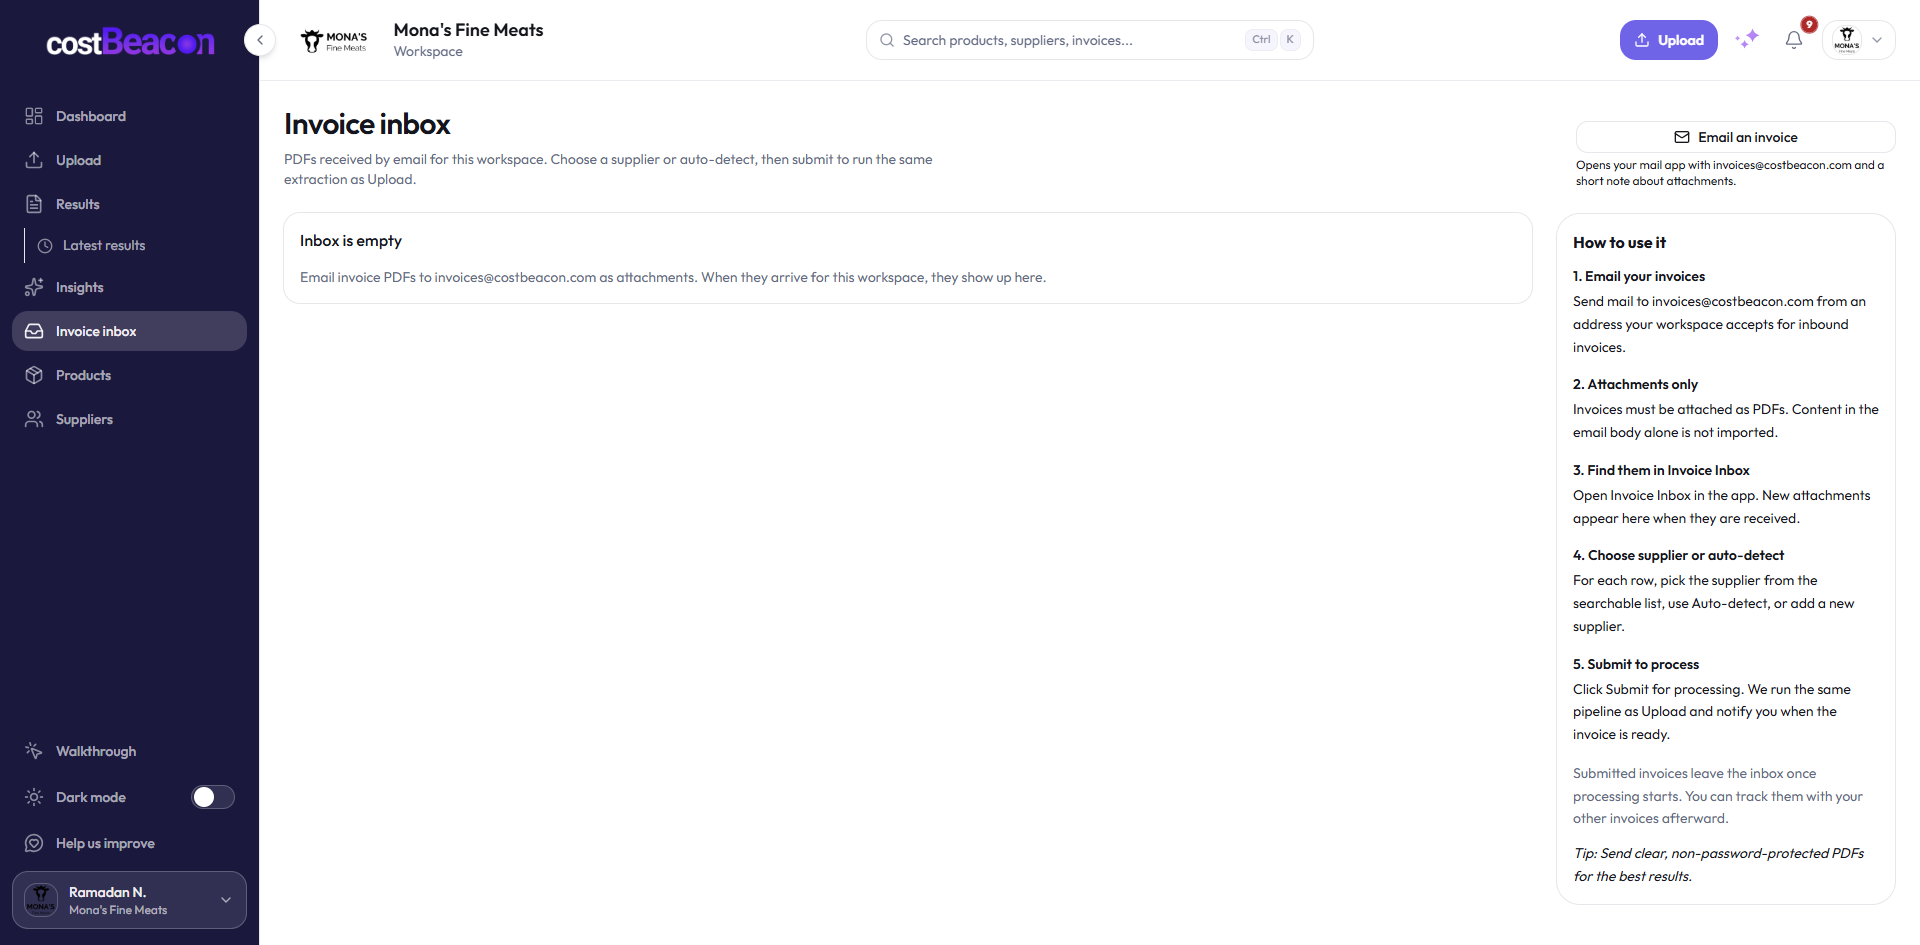
Forward supplier PDFs to your workspace address, assign suppliers, and process into the same pipeline as Upload.
Stop downloading attachments — forward them to CostBeacon instead.
Step-by-step
- Copy the inbound email address from the page header.
- Forward supplier PDFs from your mail client (attachment required).
- When cards appear, pick the supplier for each file.
- Click Process — extraction matches the Upload flow.
- Read the tips column for subject-line best practices.
Troubleshooting
- File not appearing? Allow a few minutes; confirm PDF attachment.
- Cannot process? Check billing entitlements for upload access.
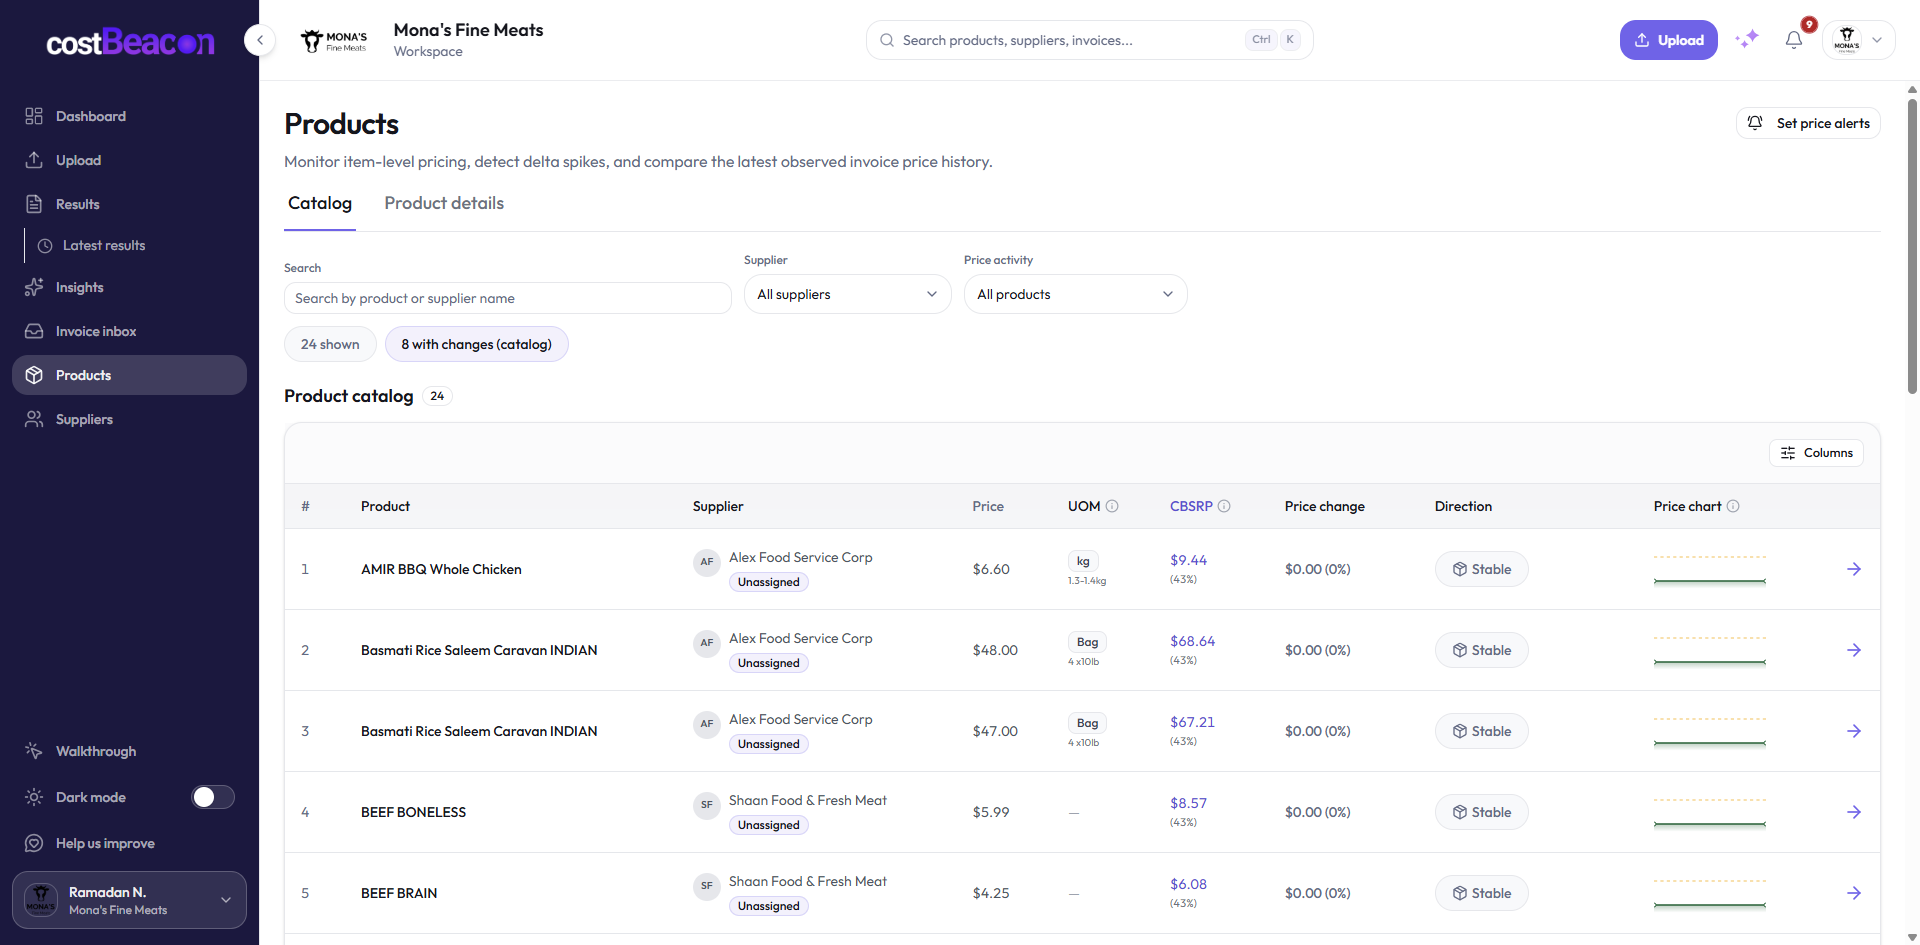
Upload & reviewProducts catalog
Every recurring line item merged across invoices — search, filter, and open full price history.
The catalog is how CostBeacon remembers what you buy repeatedly.
Step-by-step
- Use the Catalog tab to browse and filter.
- Search by name; filter by supplier or price activity.
- Open a row on the Details tab for history and linked invoices.
- Configure price alerts from the page header.
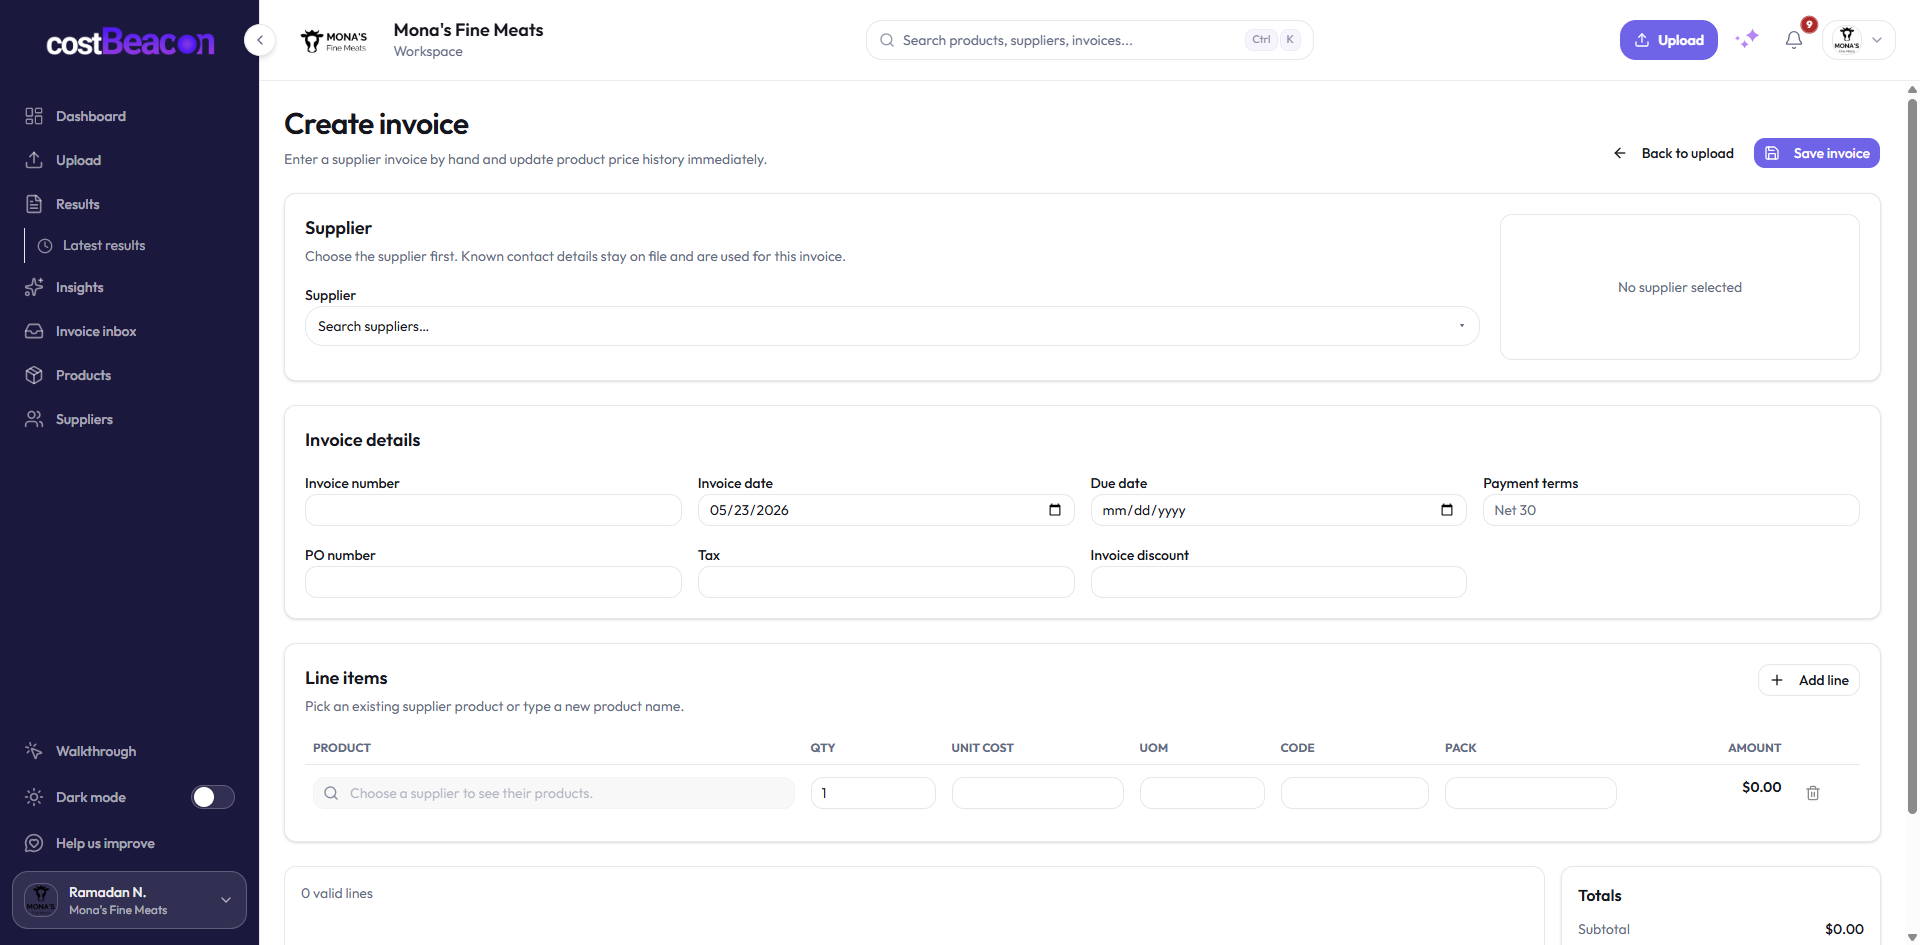
Upload & reviewCreate an invoice manually
Enter supplier, header, and lines without a PDF — data flows through the same pipeline as upload.
Use when you have structured data but no PDF scan.
Step-by-step
- Select supplier first — enables product suggestions.
- Fill invoice header: number, dates, PO, tax, discount.
- Add line items with quantity and unit cost.
- Confirm totals, then save.
- Verify in Results → Invoices.
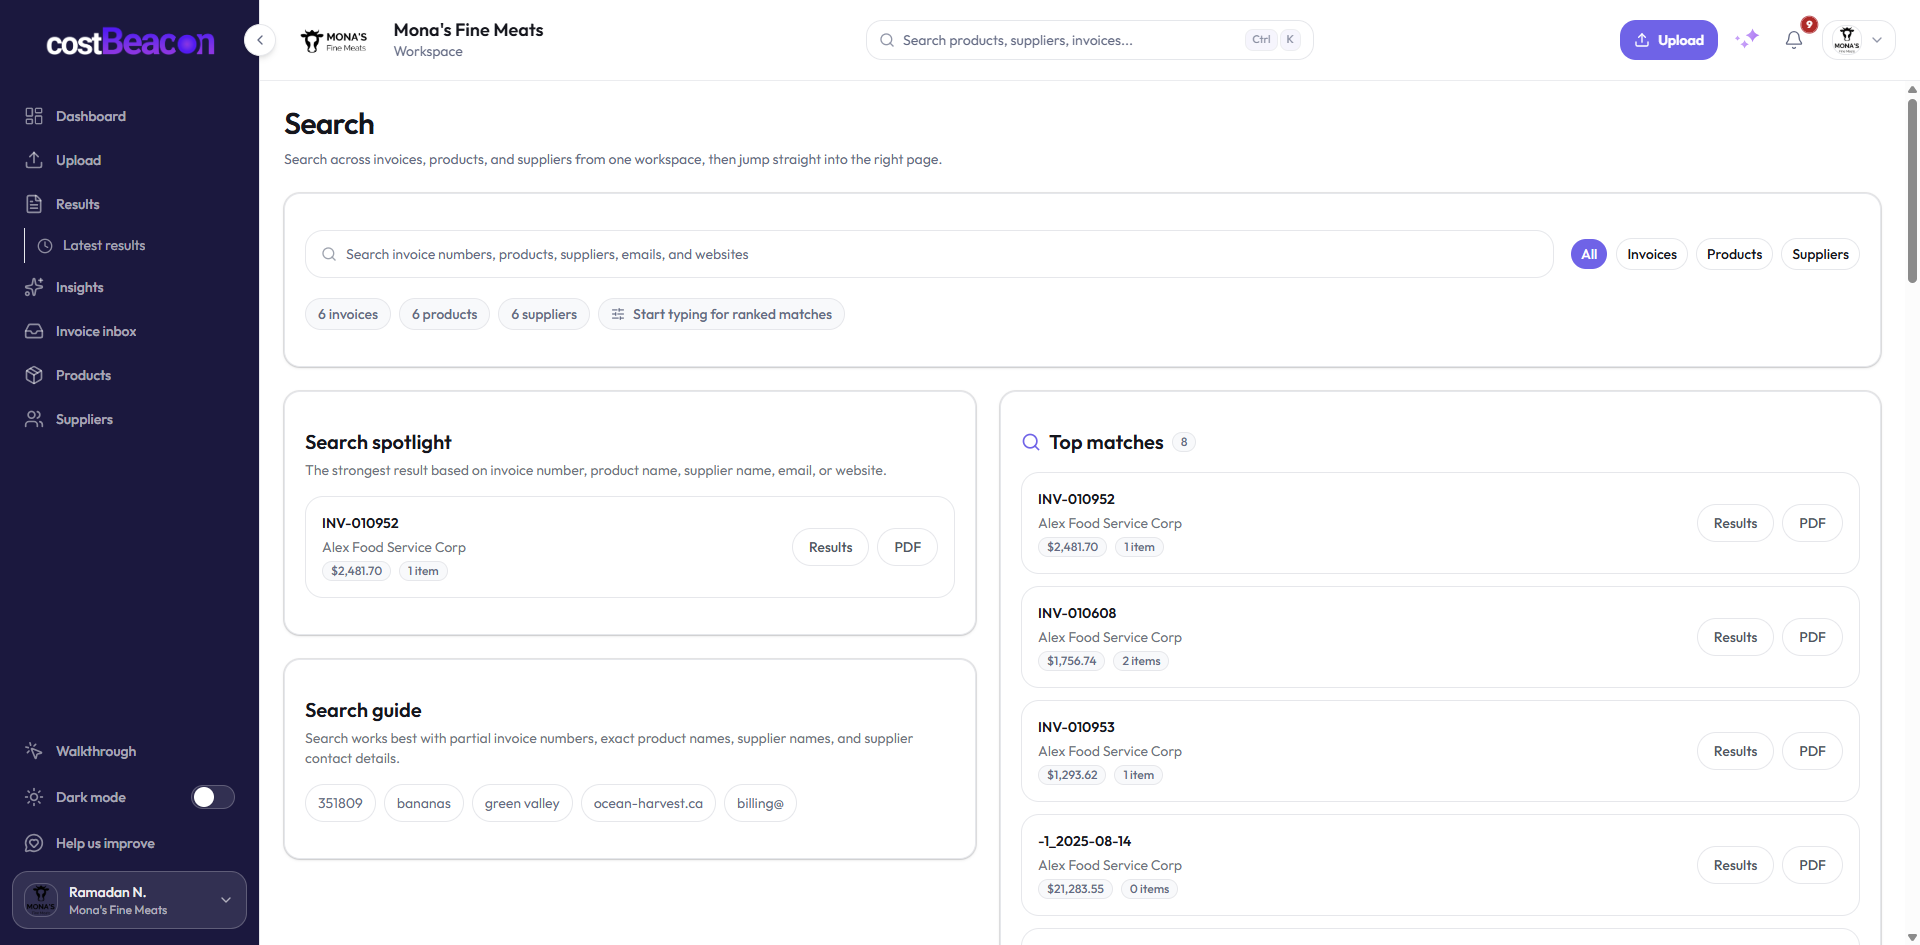
Upload & reviewGlobal search
Search products, suppliers, and invoices from the header bar or Ctrl/Cmd+K.
Find anything in your workspace without clicking through menus.
Step-by-step
- Press Ctrl/Cmd+K or click the header search field.
- Enter a product name, invoice number, or supplier.
- Narrow scope if results are broad.
- Open the top hit or browse grouped stacks below.
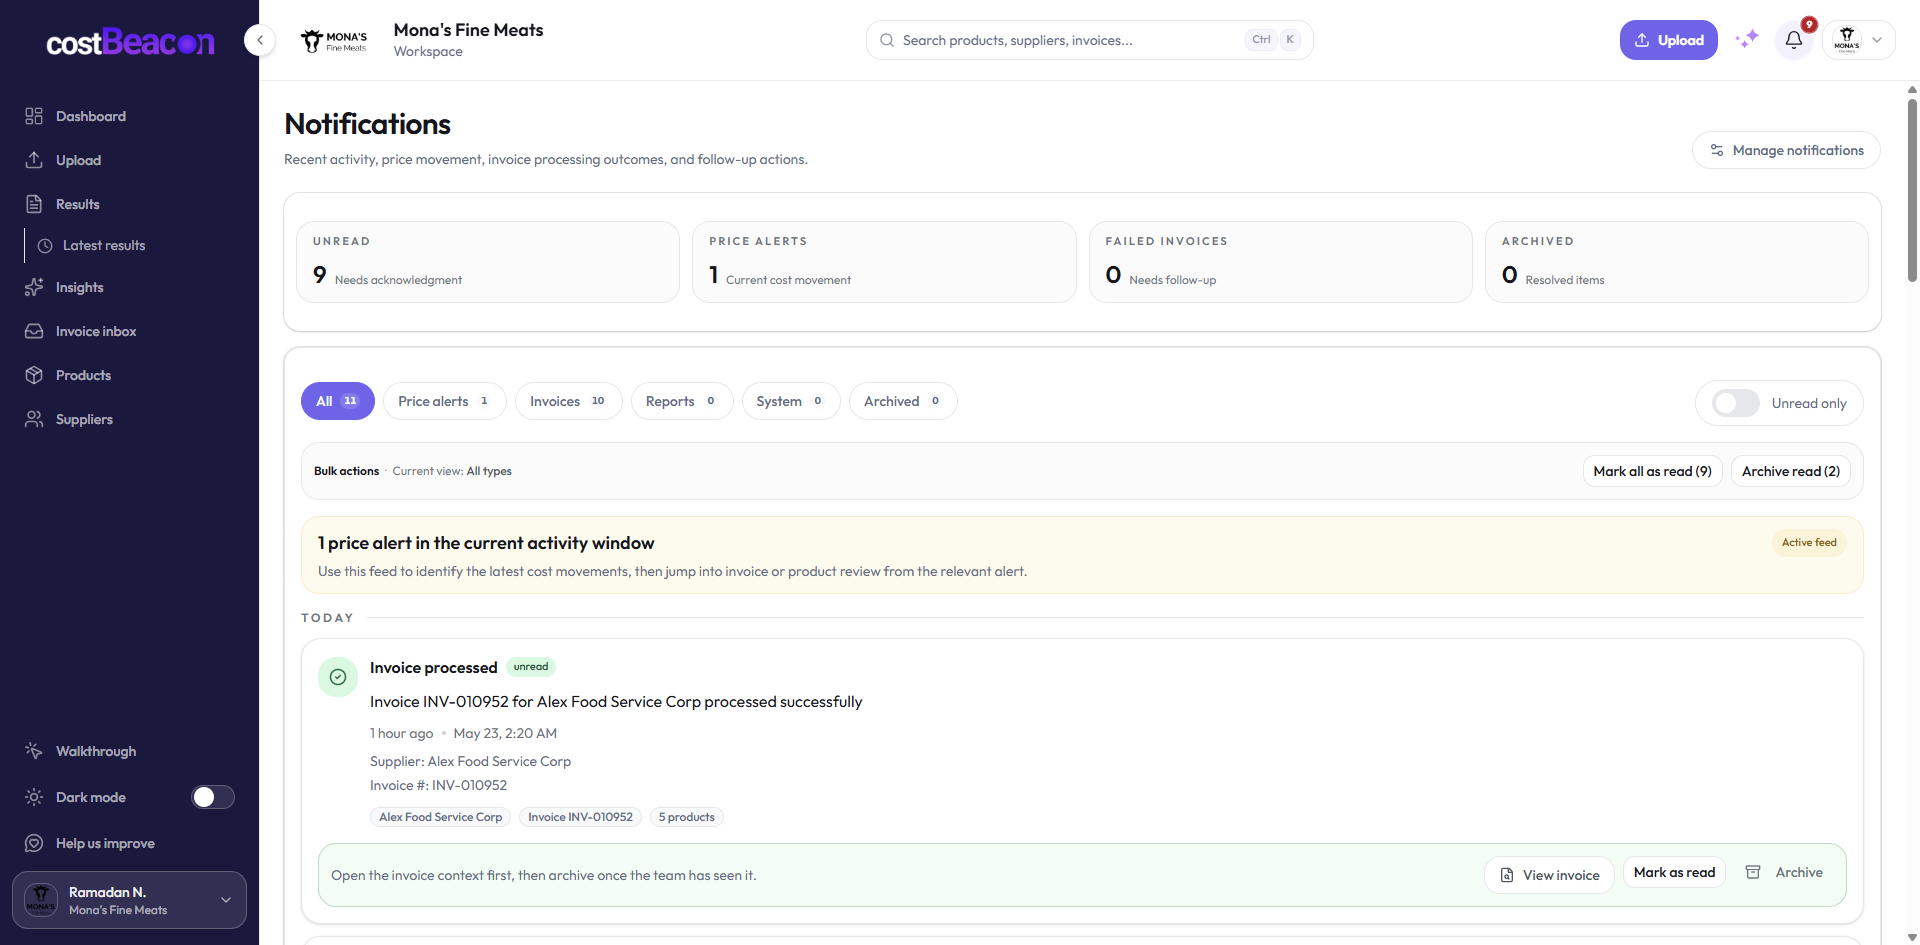
Alerts & riskNotifications center
Price alerts, processing outcomes, and workspace messages — filter, archive, and retry failures.
The bell icon is a preview; the full page has filters and bulk actions.
Notification types
- Price alerts — unit cost crossed your rules
- Processed — invoice finished OK
- Failed — extraction error (retry when available)
- Generic — workspace announcements
Alerts & riskDashboard vs Insights
Dashboard for daily snapshot; Insights for chapter-by-chapter analysis of the same period.
Same data, different questions.
When to use this
- Dashboard — daily check-in, KPIs, top risks at a glance.
- Insights — explaining trends, comparing departments, margin chapters.
Settings & workspaceProfile and security
Your avatar, language, contact info, and password — separate from workspace settings.
Settings → Profile is about you as a user.
Step-by-step
- Upload a square photo for the team directory.
- Set language for the interface.
- Update name, phone, and title under contact details.
- Use Security to send a password reset email.
Settings & workspaceWorkspace and team members
Workspace branding, invites, roles, and email connectors for invoice ingestion.
Settings → Workspace controls the shared business.
Step-by-step
- Set display name, logo, currency, and fiscal calendar.
- Invite members by email and assign roles.
- Configure connectors for email invoice ingestion.
Settings & workspaceDepartments
Group suppliers for reporting — labels, colors, and assignments roll up on Insights.
Departments power department spend charts on Insights and overview widgets.
Step-by-step
- Create a department with label and color.
- Assign suppliers from this page or the supplier detail sheet.
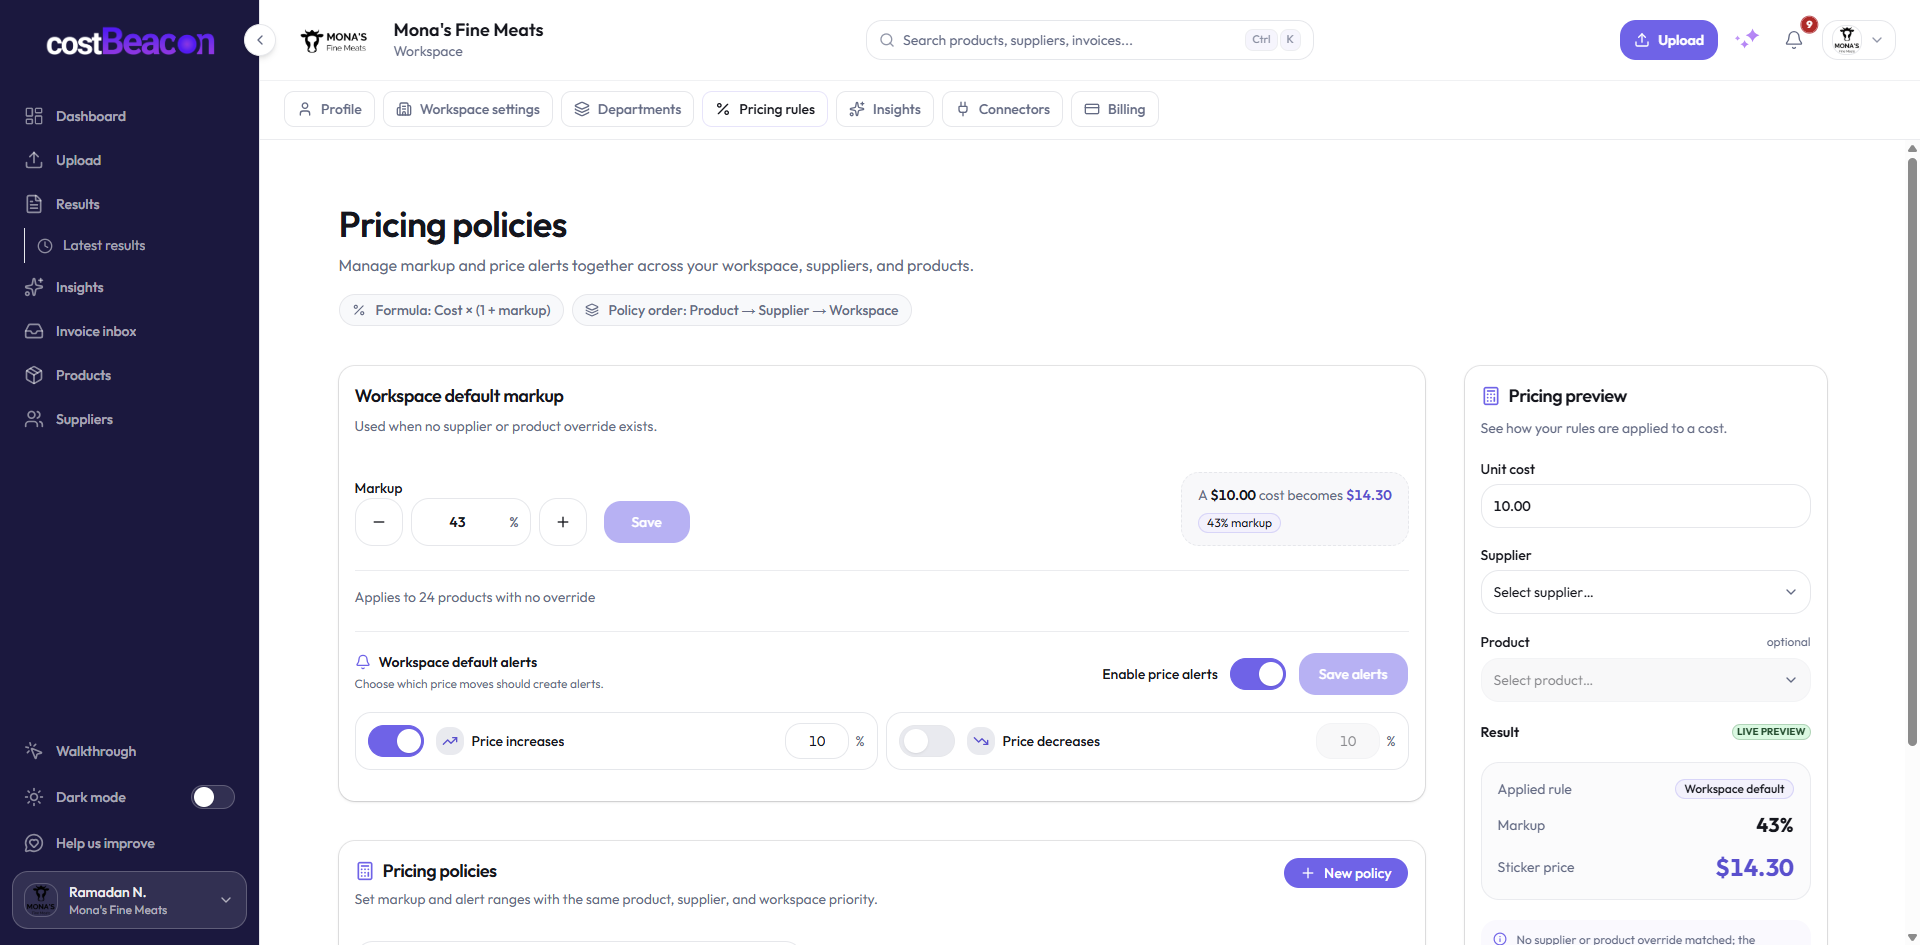
Settings & workspacePricing rules and margins
Default markup, policies, and preview — drives CBSRP and margin watchlists across the app.
Define how CostBeacon implies sell price from unit cost.
Step-by-step
- Set default markup for the workspace.
- Configure policies — rounding and guardrails.
- Use preview to sanity-check a sample SKU.
- Override margin on individual suppliers when needed.
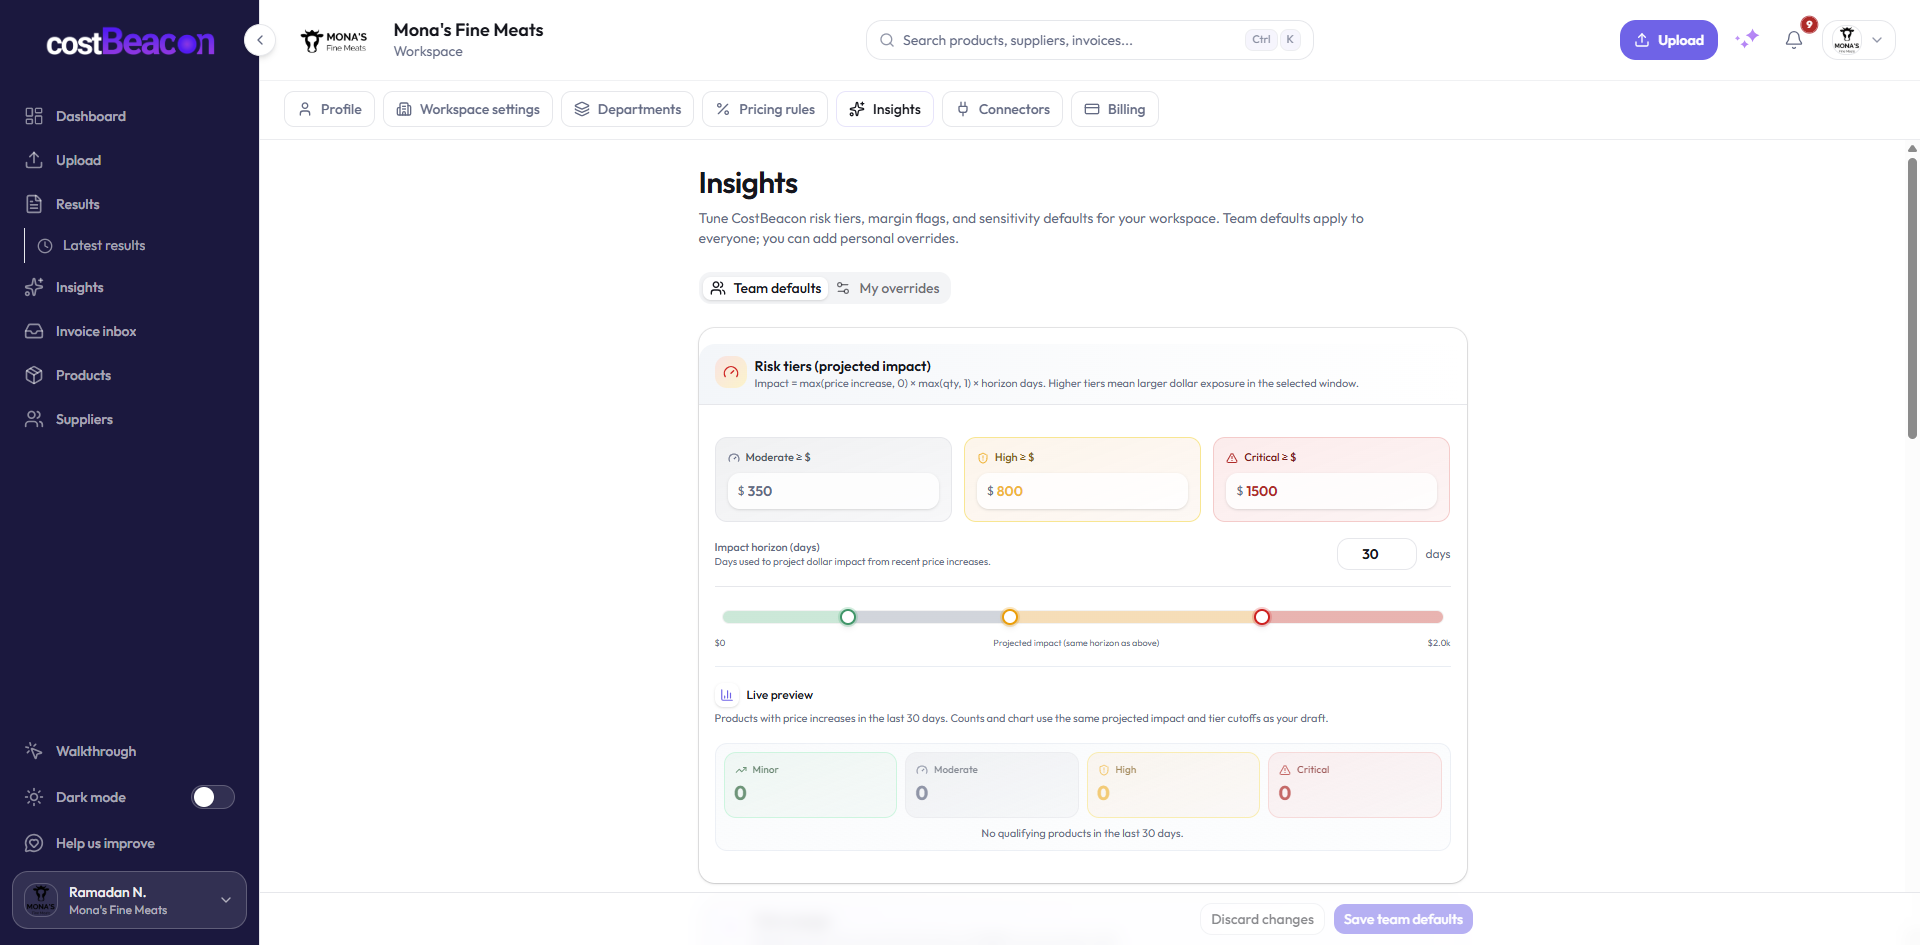
Settings & workspaceInsight thresholds
Tune risk tiers, thin margin, vendor risk, and default date range — team defaults with optional personal overrides.
Control when the app surfaces urgency.
Step-by-step
- Choose team or personal tab (if permitted).
- Adjust risk tier dollar cutoffs and impact horizon days.
- Set thin margin and vendor risk inputs.
- Pick a default date range for dashboard and Insights.
- Watch the histogram preview update as you slide.
Settings & workspaceBilling and plans
Compare tiers, payment method, and entitlements — upload limits, seats, and feature flags.
Settings → Billing shows subscription status and what your plan includes.
- Plans — compare and upgrade
- Payment method — card on file
- Entitlements — uploads, seats, Pulse, price alerts
Settings & workspaceCustomize dashboard widgets
Show or hide KPIs and charts — layout saved per browser in local storage.
Personalize the dashboard to your workflow.
Step-by-step
- On the dashboard, click Customize.
- Toggle widgets: KPIs, charts, spend drivers, watchlists, savings banner.
- Close the panel — choices save automatically in this browser.
QuickBooks & advancedCostBeacon Pulse (AI assistant)
Page-aware copilot in the header — ask questions about the data you are viewing.
Pulse understands which page you are on and the active date range.
When to use this
- Quick questions: “Which supplier increased the most?”
- Explaining a chart without building a report.
QuickBooks & advancedQuickBooks bills and payments
After connecting QBO, push bills or record payments from invoice context in Results.
Reduce double entry between CostBeacon and QuickBooks.
Step-by-step
- Connect QuickBooks under Settings → Integrations.
- Open the invoice in Results.
- Choose Create bill or Record payment when shown.
Troubleshooting
- Actions missing? Re-check QBO connection and company match.
QuickBooks & advancedReplay in-app walkthroughs
Interactive spotlights on each page — replay anytime from the sidebar Walkthrough button.
Walkthroughs are quick orientation; Support articles are the full reference.
Step-by-step
- Navigate to the page you want to learn.
- Click Walkthrough in the sidebar (above theme toggle).
- Use Next / Previous, or Skip tour.
Product basicsWhat CostBeacon does
Invoice-first price monitoring: upload PDFs, detect changes, protect margins.
CostBeacon helps small businesses catch supplier price increases before they erode margin.
You upload supplier PDF invoices (or forward by email). AI extracts line items, builds a catalog, and highlights changes. Review Results, set alerts, and negotiate with facts.
General product questions? See our FAQ.
Try fewer words, browse a category, or contact us and we will point you in the right direction.
Email CostBeacon supportStill need help?
Talk to a person if the answer is not in the help center.